A five layer chocolate and vanilla cake with soft and fluffy cake layers and a delicious chocolate buttercream filling and vanilla frosting.


Today is Tuesday. But today, I am not posting on GMT.
Instead I am posting this.
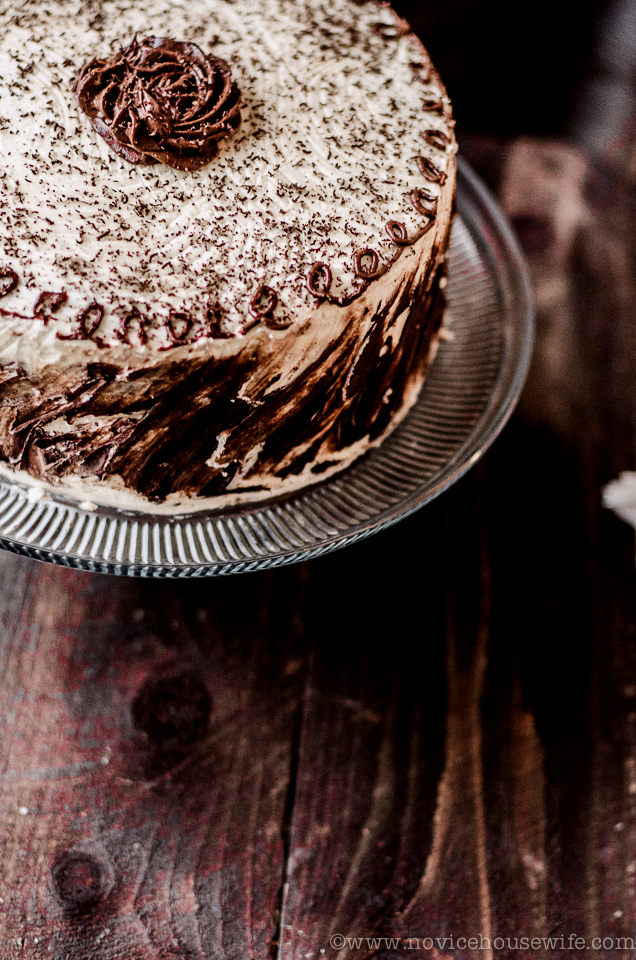
A vanilla and chocolate layer cake with chocolate malt buttercream filling and an amazing vanilla frosting on top.
Seriously!
And oh my gawd, it was so so so good. So good that I had no cake left to take pictures of how the inside of the cake looked.
Its sad because the layers did cut up real well.
It’s a shame I can’t show it though. Can you just take my word for it?

I made this cake for my friend P’s birthday.
My original plan was this cake, but then I got to know she isn’t particularly fond of marshmallows. She did mention that she liked chocolate cakes, or marble cakes.
Initially I thought I will make three marble cakes and slice them horizontally and make a six layer cake. But somehow I wanted to play on the whole marble cake idea and make a layer cake with alternate layers of chocolate cake and vanilla cake, because isnt that what marble cakes are- chocolate and vanilla mixed together.
For the filling I knew I wanted to try Rosie’s malted buttercream and this definitely is going to be my go to chocolate frosting. It was lick the bowl good. My sister in law who was in town said it was better than any Magnolia cupcake frosting she has had. She said the same for the vanilla frosting that I used to cover the cake. And that was the verdict of my friends who got to taste it as well. The frosting, both of them, really make the cake.

As you can see my decorating skills are not the best.
I originally had something different planned, but since I got to put the cake together at the last hour, just before the party, (thanks to an unexpected visit of the cooler service guy which covered the whole house in dust and led to an intensive cleaning session which would have made my mother really proud of me), I goofed up a lot with the icing and then had to somehow fix it and make it look presentable.
Not that if I had the time, I would have done a stellar job.
Anyway I have made peace with things not always going as planned and what mattered was that it should taste good and thankfully it did.
And the birthday girl loved her cake. 🙂

Notes:
- For making layer cakes, I have learnt that its always easier to slice a refrigerated cake. So what I generally do is prepare the cake a night before and once baked and cooled, I tightly wrap it in clingfilm and let it cool in the refrigerator overnight. The next day I slice it and always get good results.
- I have learnt the best way to cover a cake is to first do a crumb coat with a part of the frosting and refrigerate the cake for the crumb coat to set. Once set, slather more frosting on and with a flat spatula/ pastry scraper, smooth the frosting out.
- The chocolate malt frosting is best used right away so make it after your cake layers are baked and cooled.
- I use very little frosting and minimal filling but if you would like more frosting/filling in your cake I would suggest to double the recipe given.
- I got the recipe for the chocolate cake and frosting from here
- I got the recipe of the vanilla cake from a forum.
- I got the recipe for the vanilla buttercream frosting from here.


- 2½ cups, plus 1 tbsp all purpose flour
- 3 cups granulated sugar
- 1 cup, plus 1 tbsp cocoa powder
- 1 tbsp baking soda
- 1½ tsp baking powder
- 1½ tsp salt
- 3 eggs, room temperature
- 1½ cups buttermilk, room temperature
- 1½ cups strong black coffee, hot
- ¾ cup vegetable oil
- 1½ tbsp pure vanilla extract
- ⅓ cup butter
- ½ tsp vanilla
- 1 cup sugar
- 2 eggs
- 1¾ cups all purpose flour
- ¼ tsp salt
- 1½ tsp baking powder
- ⅔ cups buttermilk
- 1 tsp baking soda
- 2 sticks butter, room temperature
- 2 cups icing sugar, sifted
- 37.5 gms ovaltine classic malt powder
- ½ tbsp vanilla extract
- pinch salt
- 125 gm dark or semi-sweet chocolate, melted and cooled
- 60 ml whipping cream
- 1 cup unsalted butter (2 sticks), softened
- 3-4 cups confectioners' sugar, well sifted
- ¼ tsp salt
- 1 tbsp vanilla extract
- upto 4 tbsp milk or heavy cream ( I used heavy cream since we were out of milk)
- a squirt of fresh lemon juice
- ½ cup sugar
- 1 cup water
- Preheat oven to 350F.
- I used two 9 inch pans and prepared them by greasing them, sticking parchment paper and then buttered the parchment paper and sprinkled some cocoa powder. The original recipe uses 3 8 inch cake pans, but since all I had were 9 inch pans I used them and got fewer thicker layers.
- In the bowl, sift the dry ingredients.
- Combine the eggs, buttermilk, coffee, oil, vanilla in measuring cup and beat lightly with fork.
- Add the wet ingredients to the dry and beat 2 minutes on medium speed.
- Divide the batter (will be thin).
- Bake for 32 minutes, rotating the pans after 20 minutes. Continue to bake until toothpick or skewer comes almost clean (a few crumbs), about 12 more minutes.
- Let cake cool in the pans for 20 minutes and then invert them on a wire rack to completely cool.
- Cream butter, add vanilla and sugar and beat till light and fluffy. Add in eggs, one at a time, beating well after each addition.
- In a separate bowl, sift the flour, salt, baking powder, baking soda. Sift 4-5 times.
- Add dry ingredients and milk alternately to the creamed butter egg mixture, beginning and ending with the dry ingredients. Do not over mix.
- Bake in a well greased 9 inch pan lined with parchment paper for 35-45 minutes until tester comes out clean.
- Allow to cool in pan for 15 minutes, before turning it onto a wire rack to cool completely.
- In a bowl of a stand mixer, fitted with paddle attachment, combine the sugar and butter and beat on the lowest speed for a minute till mixed.
- Add the malt powder, vanilla, salt and again beta on low till combined.
- Add in the melted and cooled chocolate and beat on medium speed until smooth, about 2 minutes. This is when you will see things shaping up. Resist the temptation to stick your hand in and get a lick of the frosting.
- Add the whipping cream and beat on medium high for about a minute.
- (This frosting is best used right away.)
- Beat butter for a few minutes with a mixer fitted with a paddle attachment on medium speed.
- Add 3 cups of the powdered sugar and turn your mixer on lowest speed until sugar has been incorporated with butter.
- Increase mixer speed to medium and add the vanilla, salt and 2 tbsp cream and beat for 3 minutes. Again resist the temptation to lick the frosting. Well, what the heck, give in. A little lick wont hurt! If the frosting is too stiff, add more cream/milk. if too liquidy, add confectioners' sugar.
- Slice horizontally one of the chocolate cake into two.
- Place one of the chocolate layer at the bottom. Brush with the lemon sugar syrup. Slather with the malted chocolate buttercream. Slice the vanilla cake into two. And place one half on top of the buttercream slathered chocolate cake.
- Brush with syrup and top with the malted chocolate buttercream. Repeat for remaining layers.
- You will be left with one half chocolate layers, keep it to make cake balls or eat it like that.
- Once assembled, refrigerate till you prepare the vanilla frosting.
- Cover the cake with the vanilla frosting. I have learnt the best way to cover a cake is to first do a crumb coat with a part of the frosting and refrigerate the cake for the crumb coat to set. Once set, slather more frosting on and with a flat spatula/ pastry scraper, smooth the frosting out.
- For the final decoration I piped a rose on top with the little leftover malted chocolate frosting. You could actually double the recipe and pipe roses all around if you like. I topped with some grated chocolate and then using melted chocolate created the "fire" effect on the sides.


Awesome. I just want to dig in.
Like that tip about doing a crumb coat first. Something I will try the next time I try to frost a cake.
Don’t blame you for not being able to get pics of the cut cake. But must appreciate that you were able to give it the birthday girl, instead of eating it all by urself.
indugetscooking recently posted..Mocha Cake
beautiful looking cake- I am wondering why you say that the frosting is not perfect.
This looks pretty and so appetizing!
tanya recently posted..Speedy Shrimp – Guest Post by Shikha Bajaj
Merci beaucoup et bonne journée.
Looks beautiful and I’m sure delicious. Thank you.
Looks gorgeous but I’m not a fan of lemon, what is the lemon syrup for and does it impart a lemon flavor? Or is it mainly to keep the cake moist? Any suggestions for alternatives?
Well, you do not get to taste the lemon actually but you can leave it out completely and use only the sugar water syrup. It should be fine.
so how did you do the chocolate design on the sides?
looks delish!
Dina recently posted..Perfect Fruit Gets Top Dollar in Japan
Any birthday girl would love this cake!! Now I’m so curious to know what the layers look like ;)
Did I miss photos of what the inside of the cake looks like?
Nope you did not. As mentioned in the blog, sadly I could not photograph the insides. We cut it at night and it was over before I could take a pic of the inside.