I am getting back to my old routine and finally over the initial withdrawal symptoms experienced due to the absence of my in-laws in the house. After what seemed like ages, I met my friends and caught up on all the gossip that I had missed in the last one month. I have also got back to my morning gym routine with my friend P, and occasionally going to the track for a run. My friend, J, or how we jokingly call her Jillian (after the tough-as-nails trainer from TV’s Biggest Losers), is our motivator- pushing us to our limits and making sure we don’t give up!

On Monday, for the first time I went to a chicken pen to water and pick eggs, since my friend, who owns the pen is out of town, and in return, for taking the trouble, I got free farm fresh eggs! Woo hoo!

Another first is that V is growing a mosutache! He is doing so in support to Movember. Each year, Movember (Moustache November!!) is responsible for the sprouting of thousands of Mo’s (Australian slang for moustache, where the movement began) on men’s faces around the world, raising vital awareness and funds for men’s health, specifically for cancer affecting men.

Men who grow moustaches for the month of Movember, called Mo Bros, become walking, talking billboards for the cause, raising awareness by prompting private and public conversation around the often ignored issue of men’s health. So, V has become a Mo bro! And the moustache makes him look so funny. He is going to kill me for posting his Mo bro photo on the site. But, what the heck, I’ll do it anyways!! 🙂 🙂

Now, on the baking front, I got this book from the library exclusively on bread recipes. Had been itching to try the recipes in it but wasn’t able to find the time. I remember V’s mom wanted to learn how I make bread and thus, I got the opportunity to explore the book. Since I had spring onions on hand at that time, I decided to give the book’s version of Herbed Green Onion Bread a try with great results. V’s parents loved it and so did I! Of course V loved it too!

My mom-in-law found bread making pretty time consuming. I guess perception and passion plays an important part in how you feel about the work you do – I like bread making- I actually enjoy it and don’t find it too much work. Yes probably it is time-consuming in the sense you have to be in the house. Probably you can knead the dough and run a quick errand before it rises to double. But as for actual work- there’s only the first kneading that takes a little time but that’s just it. I love the dough- the flavor yeast gives to it and the pleasure you get eating a freshly baked loaf of bread. I am not the kind who likes what I cook- probably because of the effort it takes but when it comes to baking- I always like what I make if it turns out well- maybe its the passion I have for baking and not so much for cooking mundane things?

Read More →

A light and soft chocolate chiffon loaf cake flavored with orange liqueur. A simple and easy recipe, perfect for any occasion.

hocolate Chiffon Loaf Cake

Edited to add on April 30, 2018: This recipe for chocolate chiffon cake is super easy and yields a fluffy, soft and moist chocolate cake. Addition of orange liqueur elevates the taste of this chocolate chiffon loaf cake taste even more. Feel free to skip it in case you don’t have any on hand. While the top most picture on the post is the most recent, the one directly above went with the original post that went live on November 18, 2010. I am happy to say that I have learnt a lot about photography in the last few years and I hope I continue to grow and never stop learning.

Original Post:

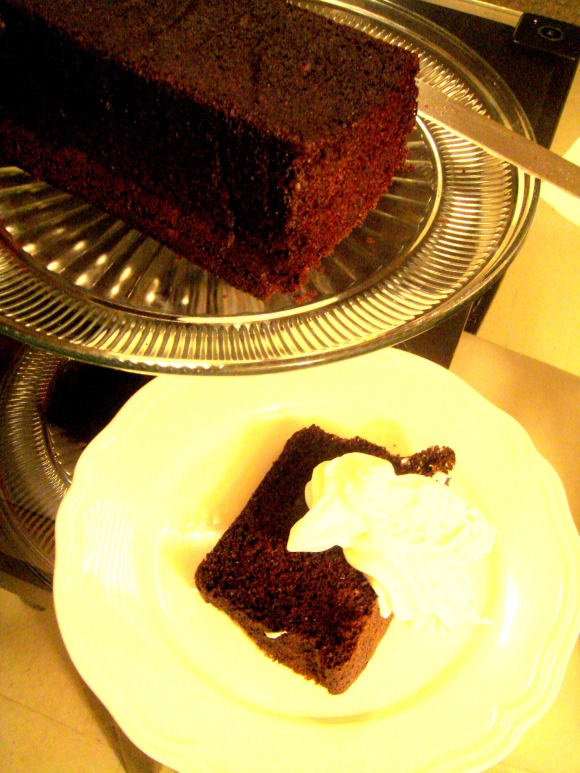
So, we are back to just the two of us in our house. Said bye to V’s parents on Sunday and came back home to an empty house. After one month of Mom’s cooking lessons, catching up on family gossip, Papa’s watering the garden, and celebrating festivals together, V and I are both alone again in the house. From being so busy to not find time to log on to the net, I now have ample time on hand, and of course, back to having nothing to do in the afternoon. Which means- I am back to blogging :)! And, that too with a chocolate chiffon cake! There couldn’t be a better way to come back!

This cake is very, very soft- like the name suggests its like chiffon- light and soft. The recipe is adapted from Classic Home Desserts by Richard Sax. I couldn’t find vanilla essence in my house, which came as a shock to me, because its never happened that I don’t have a bottle of vanilla essence in my pantry. So, instead I used a teaspoon of Godiva chocolate liqueur (like I needed an excuse for doing that!), notching up the cake a little.

hocolate Chiffon Loaf Cake

CHOCOLATE CHIFFON LOAF CAKE
 
Prep time
Cook time
Total time
 
Serves: 1 9 inch loaf
Ingredients
  • ⅓ cup unsweetened Dutch- process cocoa powder (in case, dutch process cocoa is not available, switch the baking powder called below for 1 tsp baking soda)
  • ½ cup boiling water
  • 1 tsp instant coffee powder
  • ¾ cup cake flour ( I have used all purpose flour too with good results, though cake flour is ideal)
  • ¾ cup sugar
  • 1 tsp baking powder
  • ¼ cup vegetable oil (use an oil which is neutral in taste)
  • 2 large egg yolks
  • 1 tsp pure vanilla extract
  • 2 tbsp grand marnier (optional)
  • 4 large egg whites
  • Pinch cream of tartar
Instructions
  1. Preheat oven to 180 C/350 F. Line a 8 by 4 inch loaf pan with parchment paper.
  2. In a bowl sift the cocoa powder. Add boiling water and instant coffee. Whisk till blended. Add the oil, egg yolks, vanilla and grand marnier to it. Whisk well.
  3. In another bowl, sift the flour with the baking powder and ½ cup of the sugar.
  4. Add the cocoa-water mix to the flour mix and stir till combined. Don't over mix.
  5. In a grease free bowl, beat the egg whites with the cream of tart until soft peaks.
  6. Gradually add in the sugar and beat whites till stiff peaks.
  7. Fold ¼ of the beaten egg whites to the chocolate mixture, to loosen the batter.
  8. Gently fold in the remaining batter, making sure to not deflate the whites.
  9. Scrape the batter into the prepared pan; smooth the top.
  10. Bake until toothpick comes clean when inserted in the centre of the cake, about 50 minutes (start checking after 40-45 minutes, depending on your oven)
  11. Cool cake in pan on wire rack for 10 minutes. Invert and let cool to room temperature. Enjoy!


Flourless chocolate cake- a gluten free, rich dark chocolate cake. Chocolate lovers will swoon over this dessert.

Gluten free flourless chocolate cake- a rich dark chocolate cake recipe

POST UPDATED on January 16, 2018: A rich dark, chocolate cake recipe that will please all the chocolate lovers in your life. Feel free to omit instant coffee powder or the grand mariner, if you like. While the cake is absolutely decadent with the ganache, I have made it without the ganache and a simple dusting of powdered sugar and it still works out to taste great. The pictures have been updated, although I have kept the above picture from the original post as a reminder for when I started shooting food. 

ORIGINAL POST:

Yesterday, it was our 6 month anniversary! (Saying that aloud reminds me of the How I Met Your Mother episode where Robin dumps her boyfriend for celebrating their weekly anniversary- she finds it gay!ouch!). Anywho, and hopefully not sounding gay, yesterday V and I completed 6 months of being together as a married couple. And for us, it was a big deal! Since we had two weddings- 19th March we had our Hindu wedding and 20th March our Sikh one, we get two days to celebrate our anniversary (I’m sure in the future it will be a handy excuse for someone who forgets our anniversary-‘Oh! For me, it will always be on the 20th!’).

Though we wished each other on 19th, I wanted to surprise V with a cake. And since 19th was a Sunday, a day when V is in the house the whole day, I decided to surprise him on the 20th. Because we ate out on 19th, he thought we already celebrated our anniversary and was clueless of the surprise I was cooking up or more like baking up. I am a genius!

Gluten free flourless chocolate cake- a rich dark chocolate cake recipe

So yesterday, I baked the cake in the morning, hid it in the guest room when he came home for lunch. Assembled the cake as soon as he left. Since I had to go for Zumba in the evening, I hid the cake in the fridge, so that when V came back from work he accidentally wouldn’t see the cake. And, luckily, I can trust him to not look inside the fridge when I am not there! When I came back from Zumba, V decided to go to the gym- great!, giving me time to set up surprise- candles, cake and the works.

Now, the cake wasn’t as great as I would have liked it to be. I wanted to like this recipe, I really did want to- its Julia Child’s. But, something just did not sit right with me when it came to the taste. Even though I like my chocolate bitter- the cake was more bitter than I would have liked. Yes, there were some issues with the ingredients- I did not have the required amount of bittersweet chocolate, so substituted a part of it with unsweetened chocolate and upped the sugar amount- but the cake was still quite bitter.

So instead of posting the recipe of the cake I made for our 6 month anniversary, I am posting the recipe for my famous (yes, I count something liked in my family as famous) flourless chocolate cake recipe which has consistently given me great results (the picture at the beginning of this post is of that same famous chocolate cake). The cake has more of a mousse-like texture and is really, really rich. So keep the portions small! The recipe is adapted from Bon Appetit, September ’08 issue.

Gluten free flourless chocolate cake- a rich dark chocolate cake recipe

FLOURLESS CHOCOLATE CAKE
 
Prep time
Cook time
Total time
 
Serves: 1 10 inch cake
Ingredients
  • 1 cup water
  • ¾ cup sugar
  • 9 tbsp unsalted butter, diced
  • 18 ounces (500 gms) bittersweet or semisweet chocolate, chopped
  • 6 large eggs
  • ½ tsp instant coffee
  • 2 tbsp grand mariner (optional- instead add 1 tbsp vanilla essence)
  • pinch sea salt
Ganache
  • 1 cup heavy cream
  • 8 ounces (226gms) bittersweet chocolate, chopped
Instructions
  1. Preheat oven to 350 F/ 180 C. Butter a 10" diam springform pan. Line the bottom of the pan with parchment rounds. Butter the parchment. Wrap 3 layers of heavy duty foil around outside of the pan, bringing the foil to the top of the rim. (Like how one does for a cheesecake.)
  2. Combine 1 cup water & sugar in a small saucepan. Bring to a boil over medium heat, stirring until the sugar dissolves. Add the instant coffee powder and let simmer for 5 min. Remove from heat. Add the vanilla extract or grand mariner. Add the sea salt.
  3. Melt butter in a large saucepan over low heat. Add the chocolate & whisk until smooth. Whisk sugar syrup into the chocolate, cool slightly.
  4. Add eggs to the chocolate mix, one by one making sure to scrape the edges after each addition. Whisk until well blended. Pour batter into prepared pan. Place cake pan in a large roasting pan. Add enough hot water to the roasting pan to come halfway up sides of cake pan.
  5. Bake until the center no longer moves when the pan is gently shaken, about 50 min. Remove from the water bath. Transfer to a rack. Cool completely in the pan.
For the ganache
  1. Bring whipping cream to simmer in small saucepan over med heat. Remove from heat. Add the chocolate & whisk until smooth. Pour over top of cake still in pan. Gently shake pan to distribute ganache evenly over top of cake. Refrigerate cake in pan until ganache is set, about 2 hrs.
  2. Run a knife around the pan to loosen the cake & release sides.
  3. Cover with chocolate shavings & cocoa dusting.
  4. You can make the cake 2 days ahead. Cover & keep in the fridge.